
Alia is Circa's AI-assisted tool built for LCAs at scale, designed for WBLCA and high-volume LCA workflows. Upload a BoM or BIM file and Alia automates the most tedious parts of the workflow: structuring content, matching background datasets, enriching missing product data, and automatically scaling quantities.
How Alia works#
Alia is organized into 5 stages.
- Upload your BoM or BIM file, or start from scratch.
- Table Mapping: Check that your columns were captured correctly.
- Component Management: Review the uploaded content
- Background Data Matching: Match to background datasets
- Scaling: Scale the background datasets to your quantities.
Once all five stages are complete you will reach Outputs, where you pull impacts, export results, or open your model in Gesserit.
The sections below walk you through each one.
Roles and permissions#
Alia is collaborative. Permissions are set per project, so a teammate can be a Developer on one product and an Explorer on another.
| Role | What they can do |
|---|---|
| Developer | Full read and write capabilities. View all foreground and background data, edit cells, run AI commands, assign work, and invite other members. |
| Explorer | View only access. Explorers cannot edit the table or export the report, and can only see the data they pulled themselves. |
| Contributor | An invitee from outside your team. Contributors only fill in specific cells that have been assigned to them. |
The team member who creates the product is automatically the first Developer. To move an Explorer up to a Developer, an existing Developer invites them. Contributors are covered in Assign cells.
Create a Product#
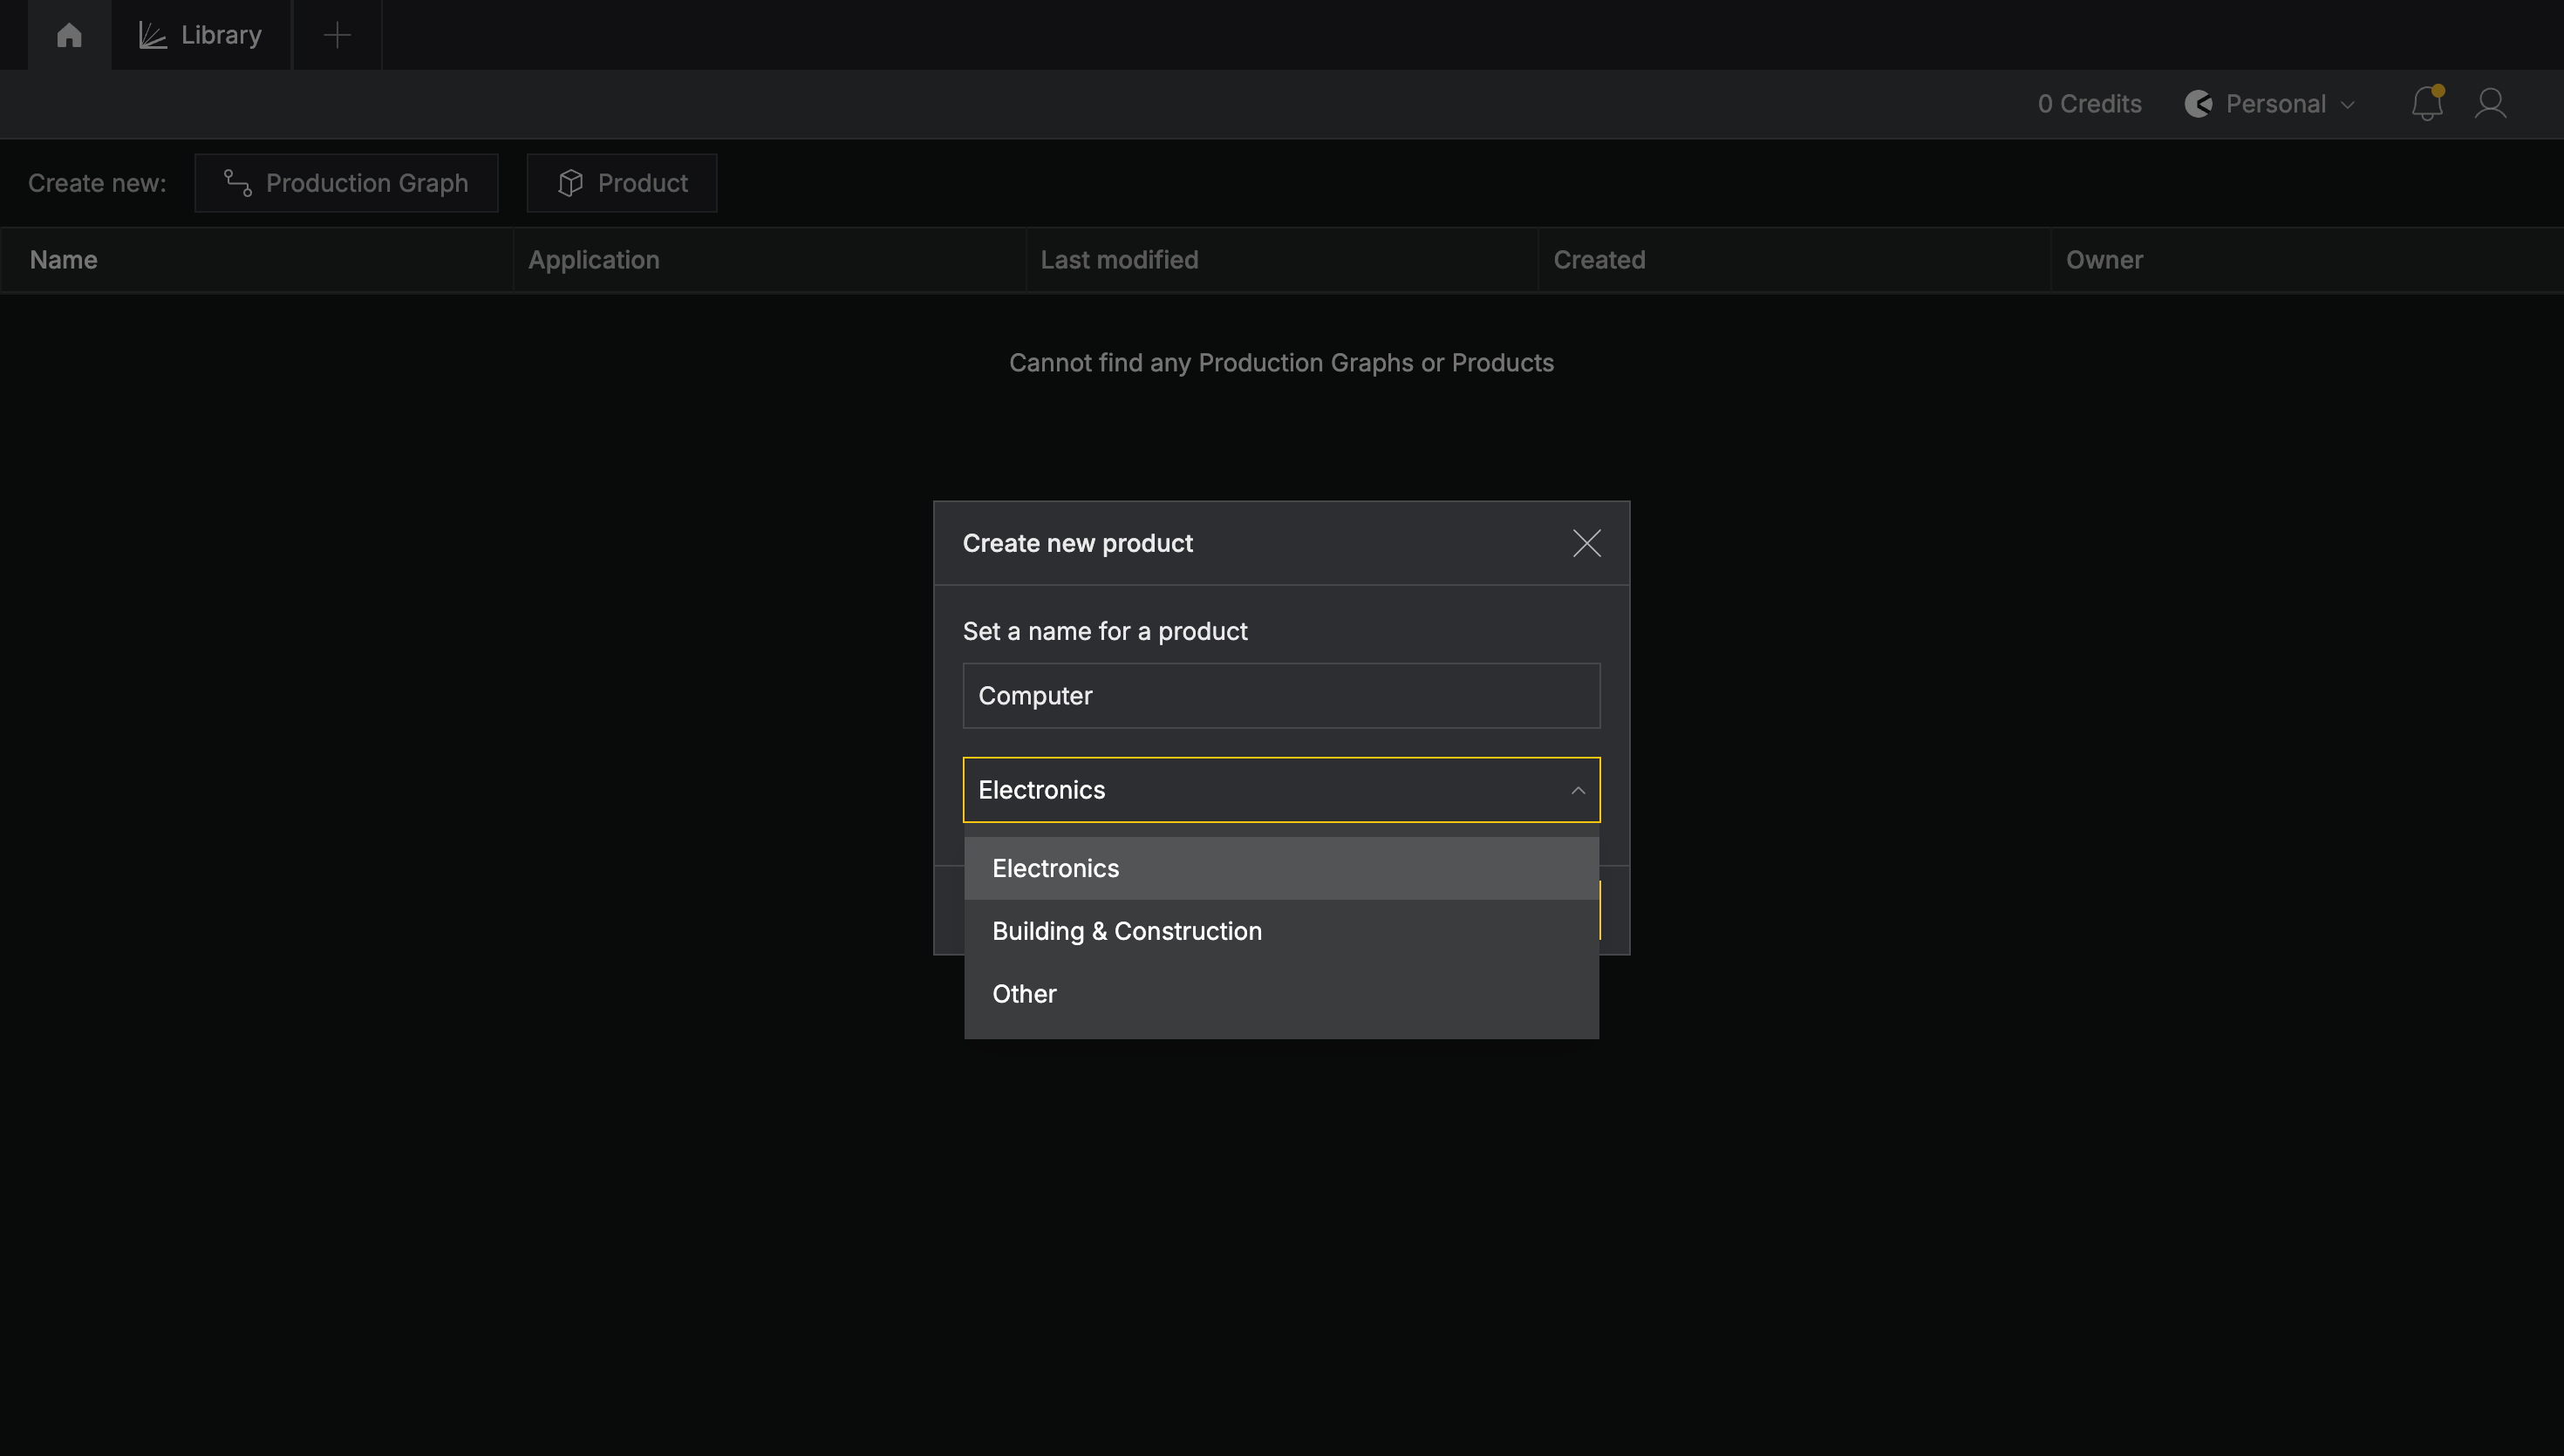
From the home screen, click Create new: Product, name your product and select the type of product: Electronics or Building & Construction or Other .
The category you select determines which AI model Alia uses for your product, so choose the closest fit.
Need a category that isn’t listed? Contact us to request one.
Upload your File#
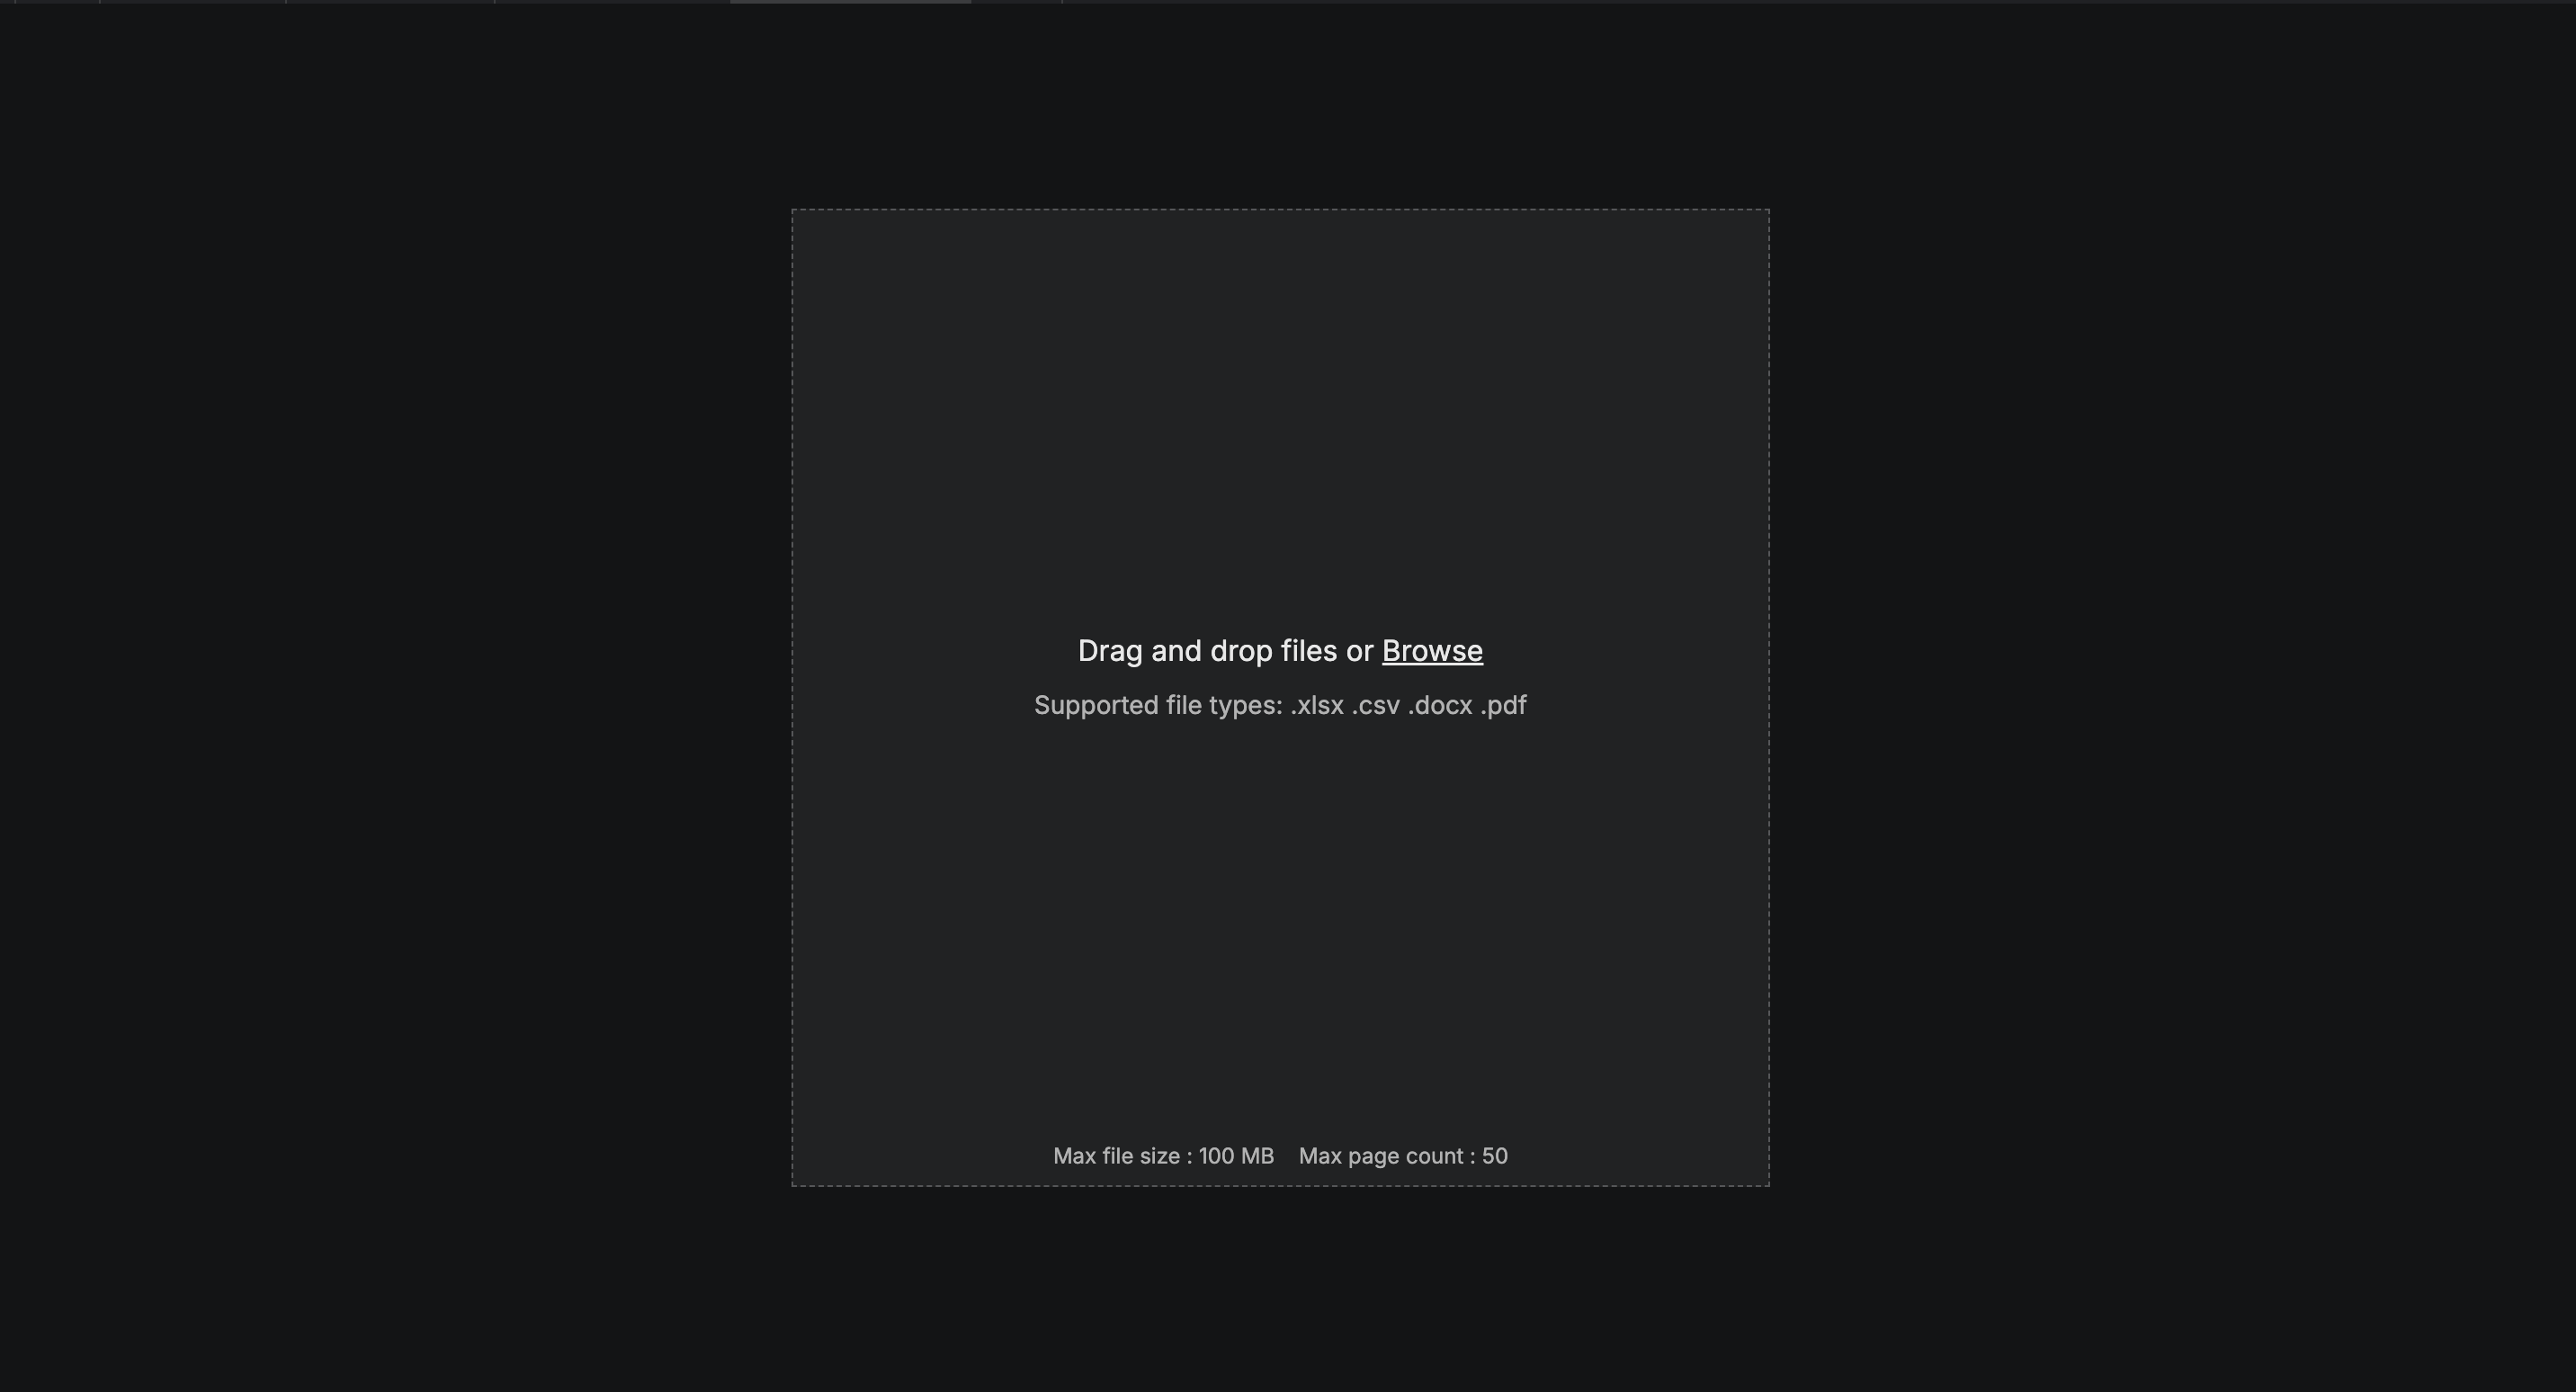
Alia currently supports .xlsx, .csv, .docx, and .pdf. Drag and drop your BoM or BIM file or click browse to upload through your computer. Files can contain images or diagrams.
A well-prepared file maps faster and more accurately. For guidance on structuring your file before import, see How to Prepare your BoM File for Import.
Start from a blank table#
If you’d like to build the product from scratch, click Start a blank table . Starting blank will open the product directly in Component Management with an empty table. Add components and properties yourself, then advance as normal.
Set your functional unit#
Once upload stage is complete, enter the Quantity and Functional unit of the finished product.
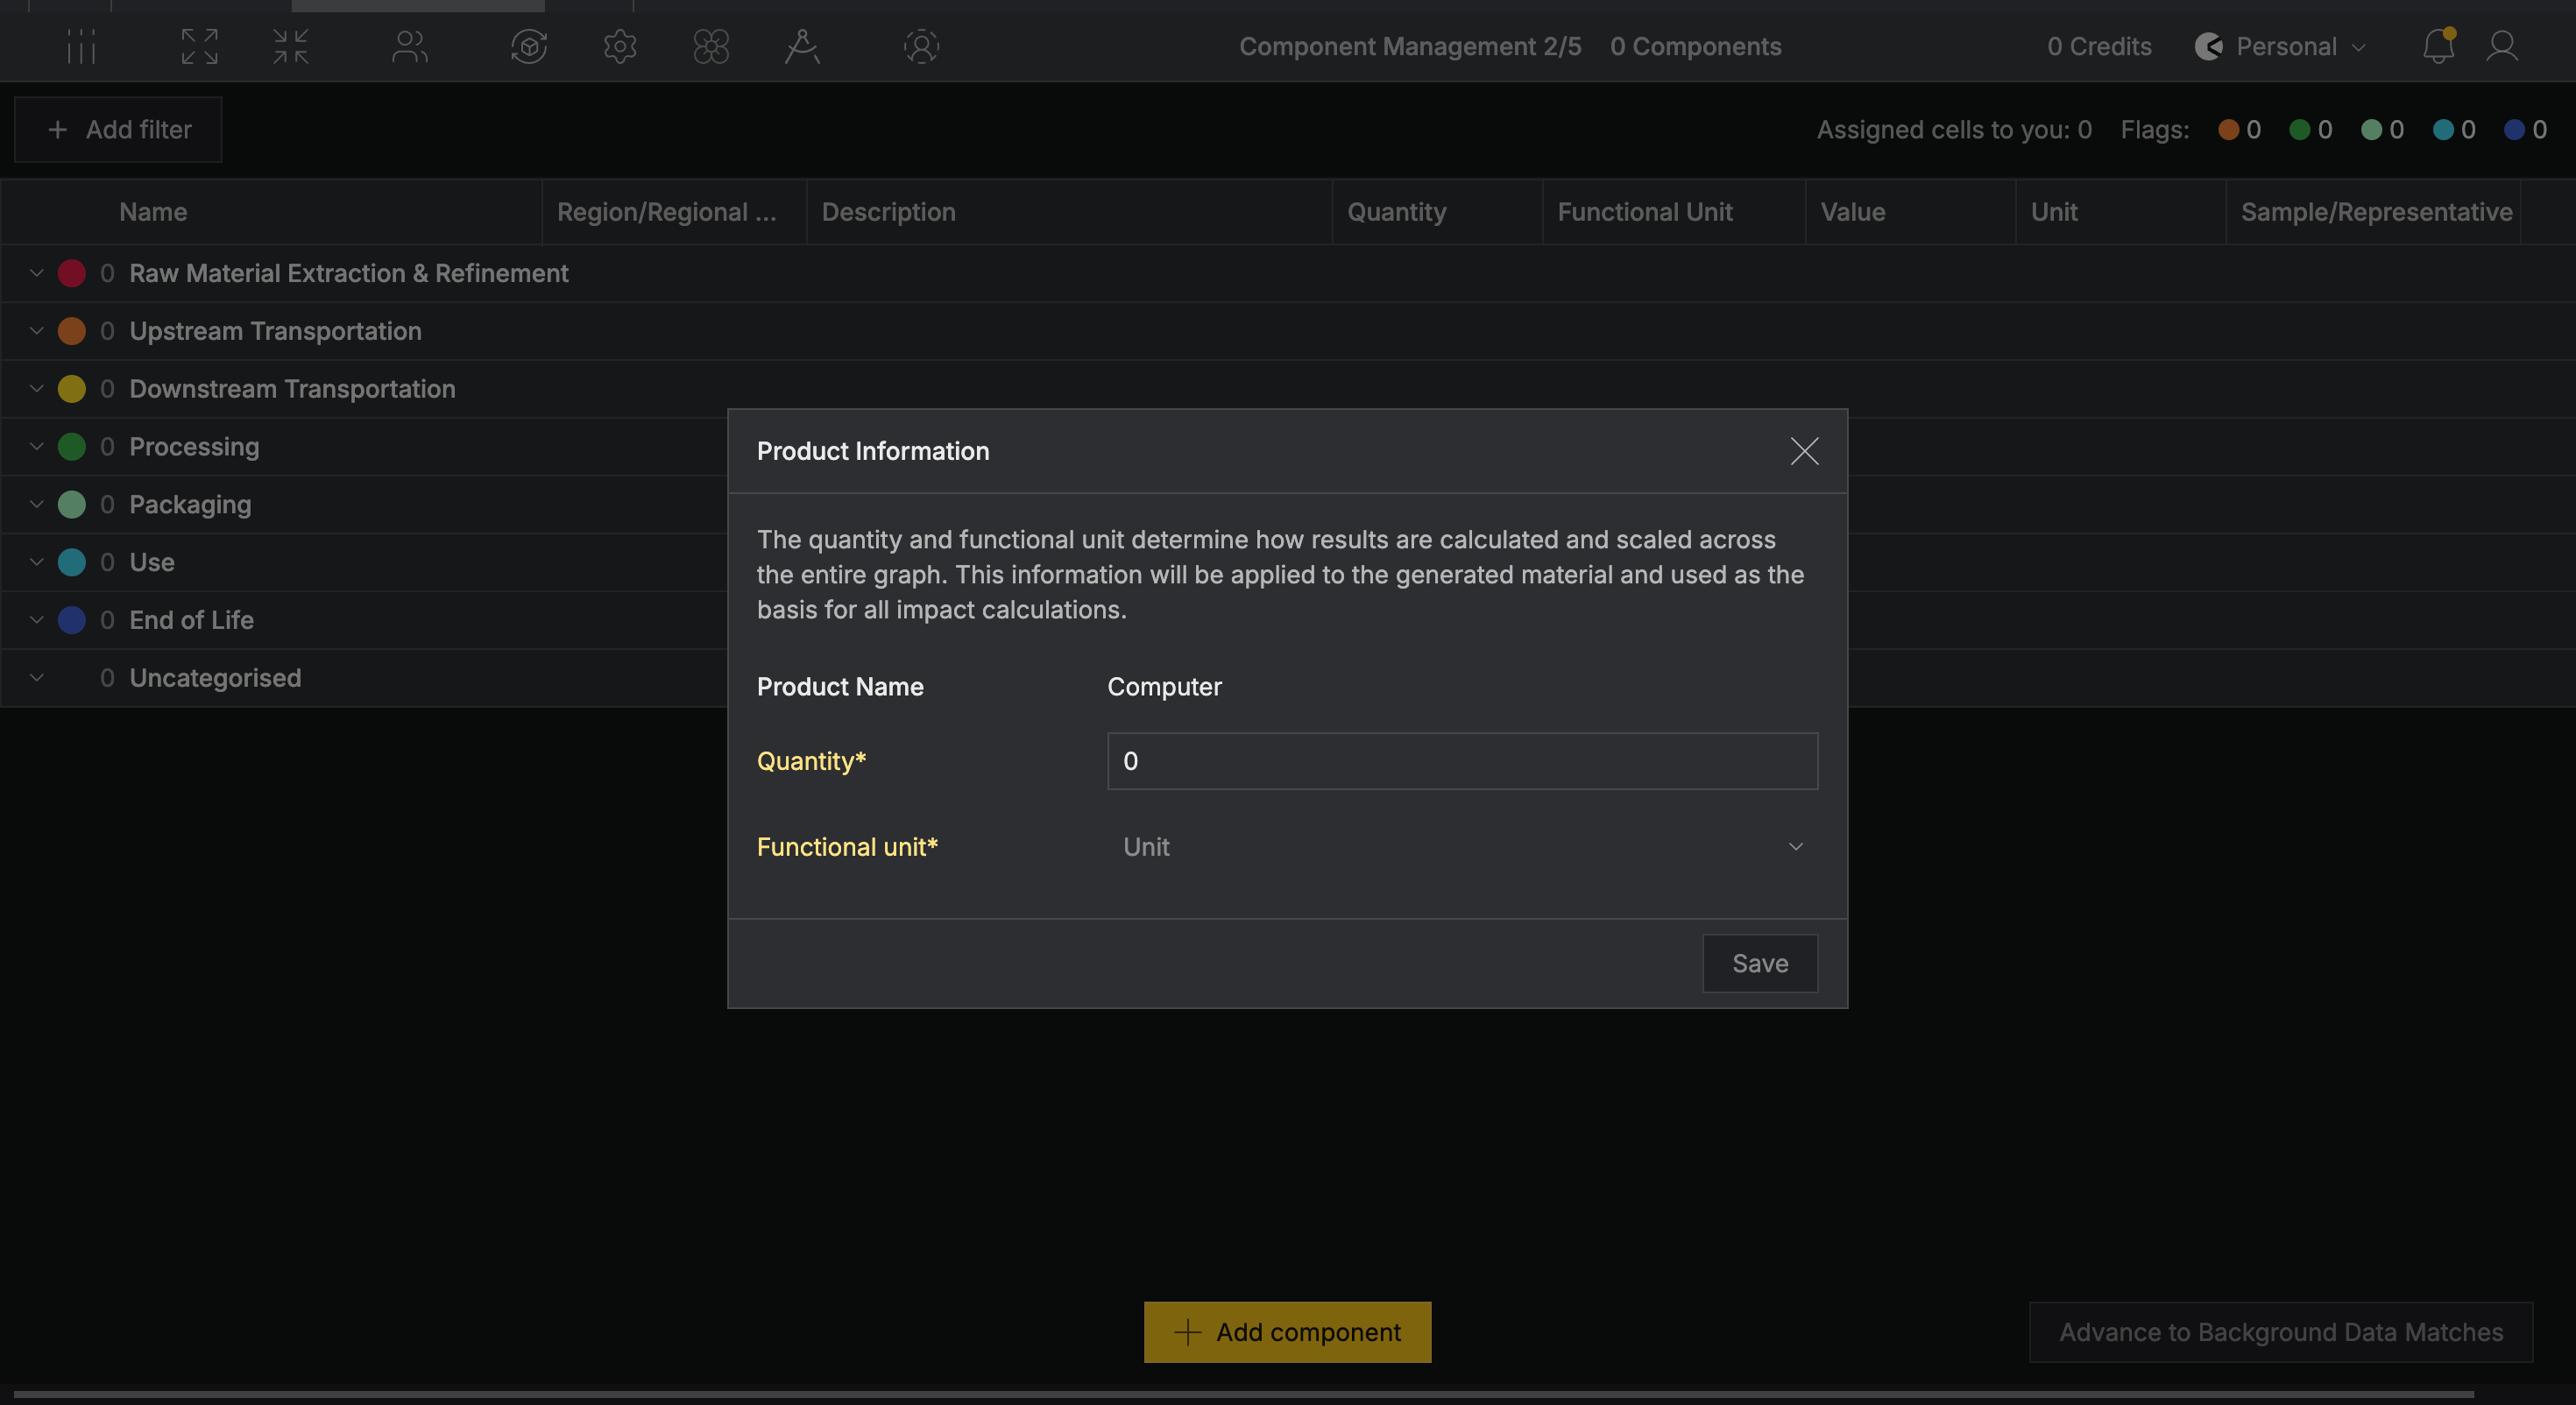
Table Mapping#
Once your file is uploaded, review the imported columns to confirm the columns from your BoM or BIM were captured correctly.
Click Column Formatting and uncheck any columns you don’t need.
Component Management#
Review each component and its properties. You can add, delete, or modify any cell directly in the table.
View component properties#
Click the arrow dropdown next to a component’s name to expand its properties.
Properties are the quantitative details of a component, like mass, area, or cost. Properties are important as Alia uses them in the Scaling stage. The property values are what connect your component’s real-world quantities to the background dataset. Reviewing them now means cleaner results later.
Add a component#
Click Add Component at the bottom of your screen, name the component and click Add. The new component will appear at the bottom of your table.
Delete a component#
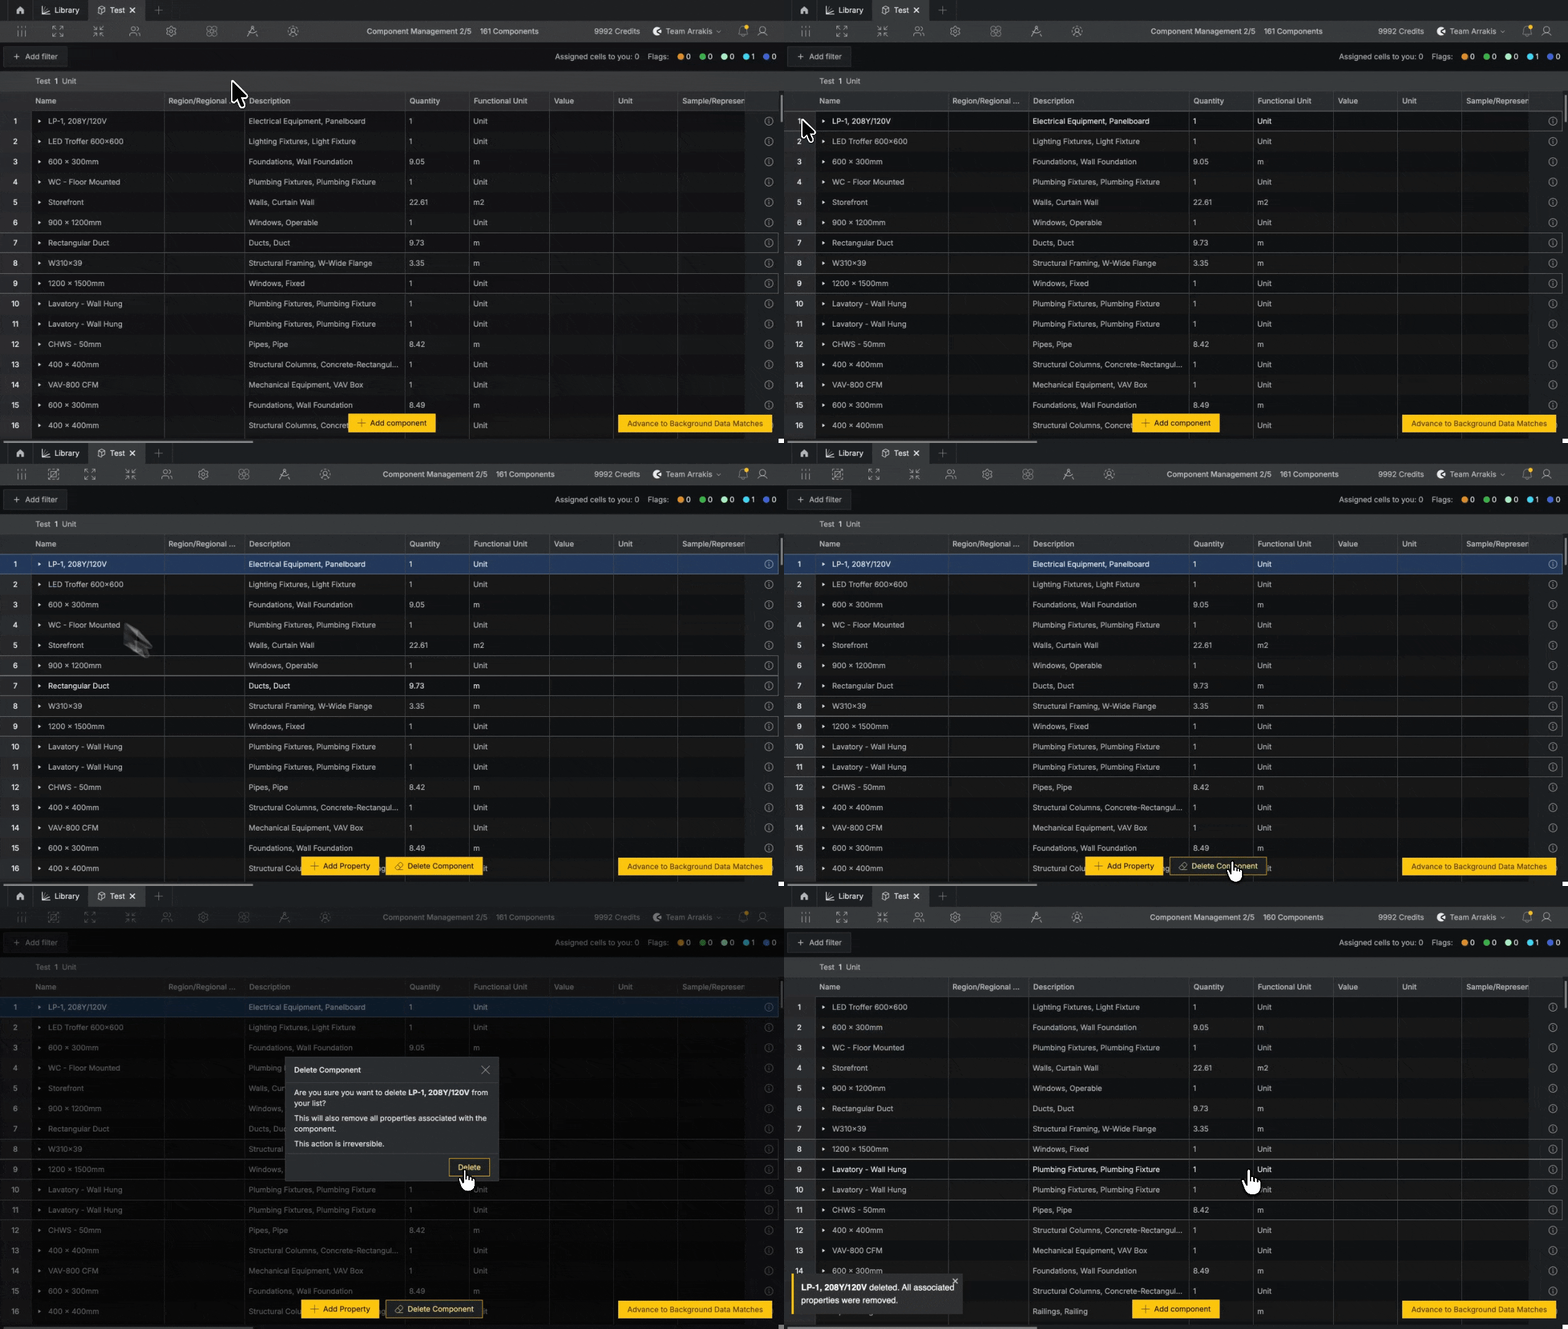
Click the component you would like to delete, then clickDelete Component. The selected component will be removed from your table along with its properties.
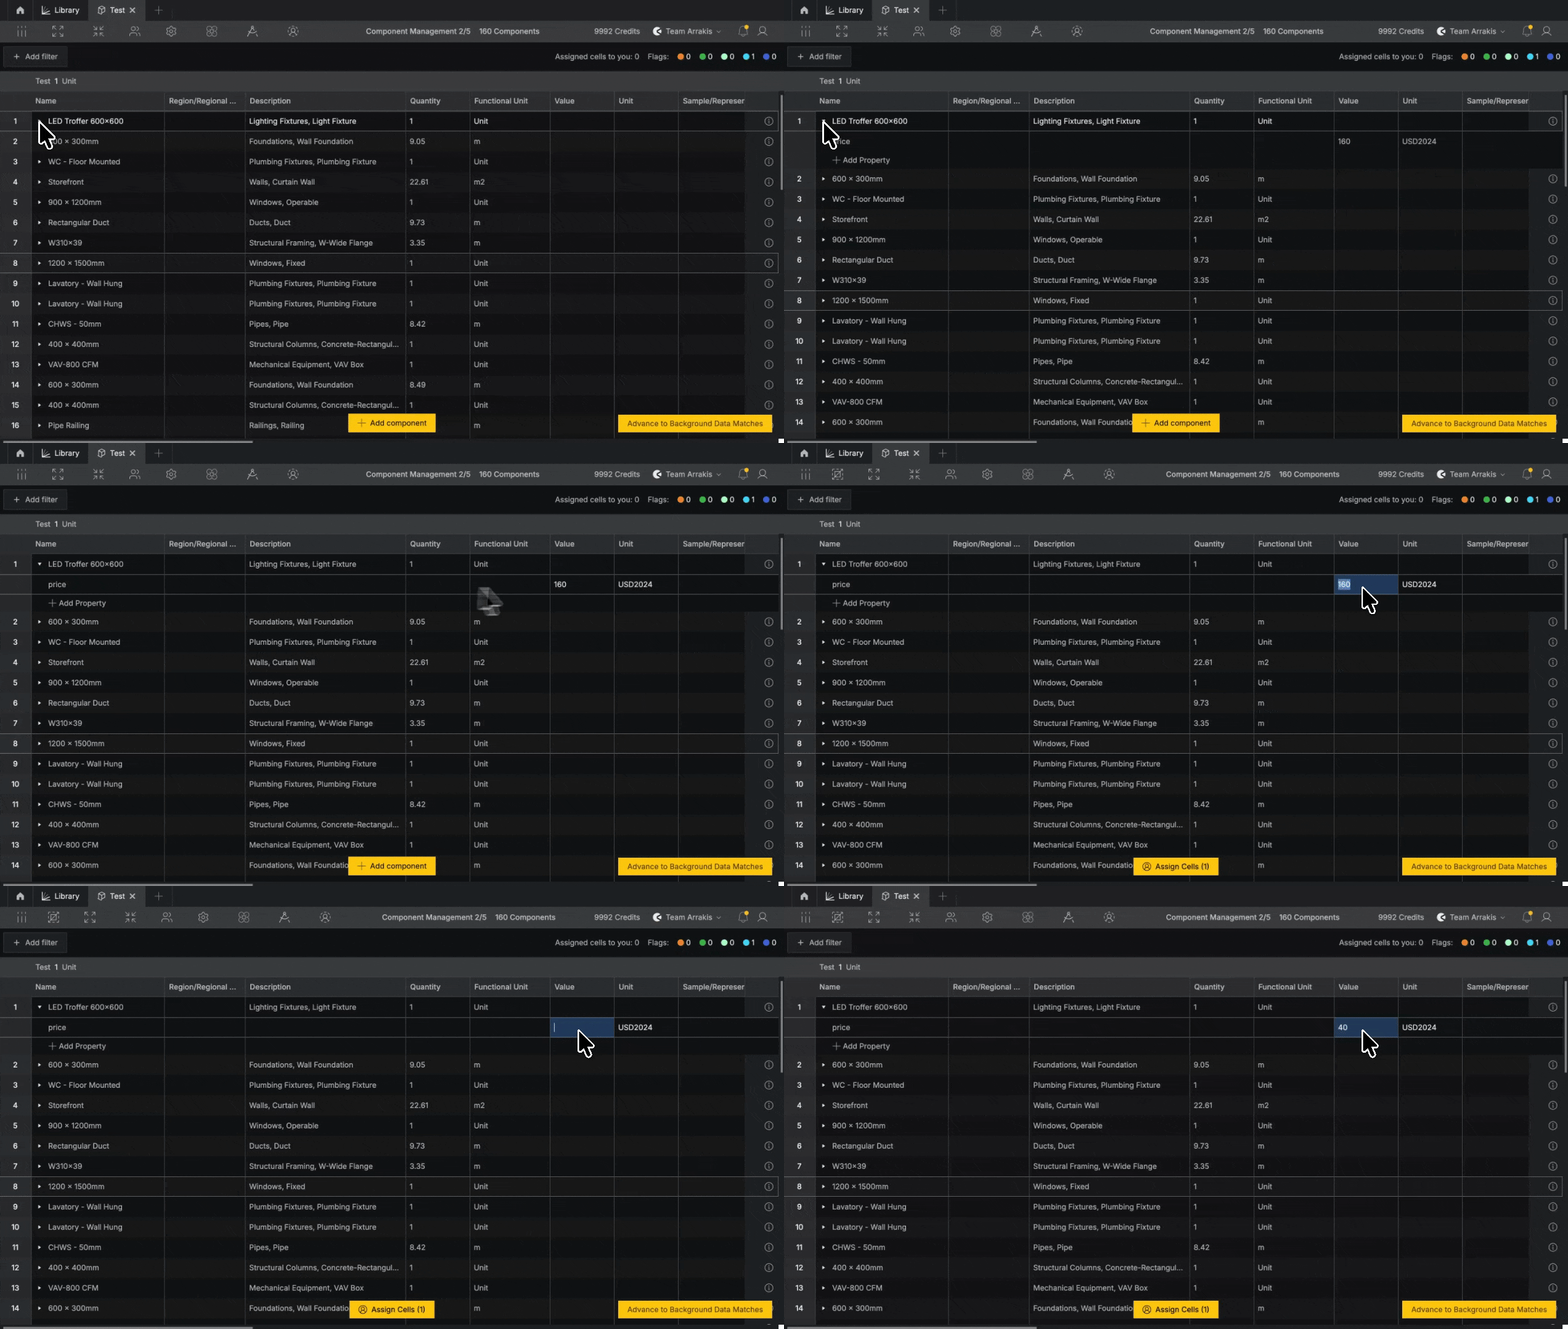
Add a property#
To add a property, click the dropdown button to the left of the component name, click Add property, select a property from the dropdown options, then add a unit.
Edit a property#
To edit a property, double-click the cell and make your changes.
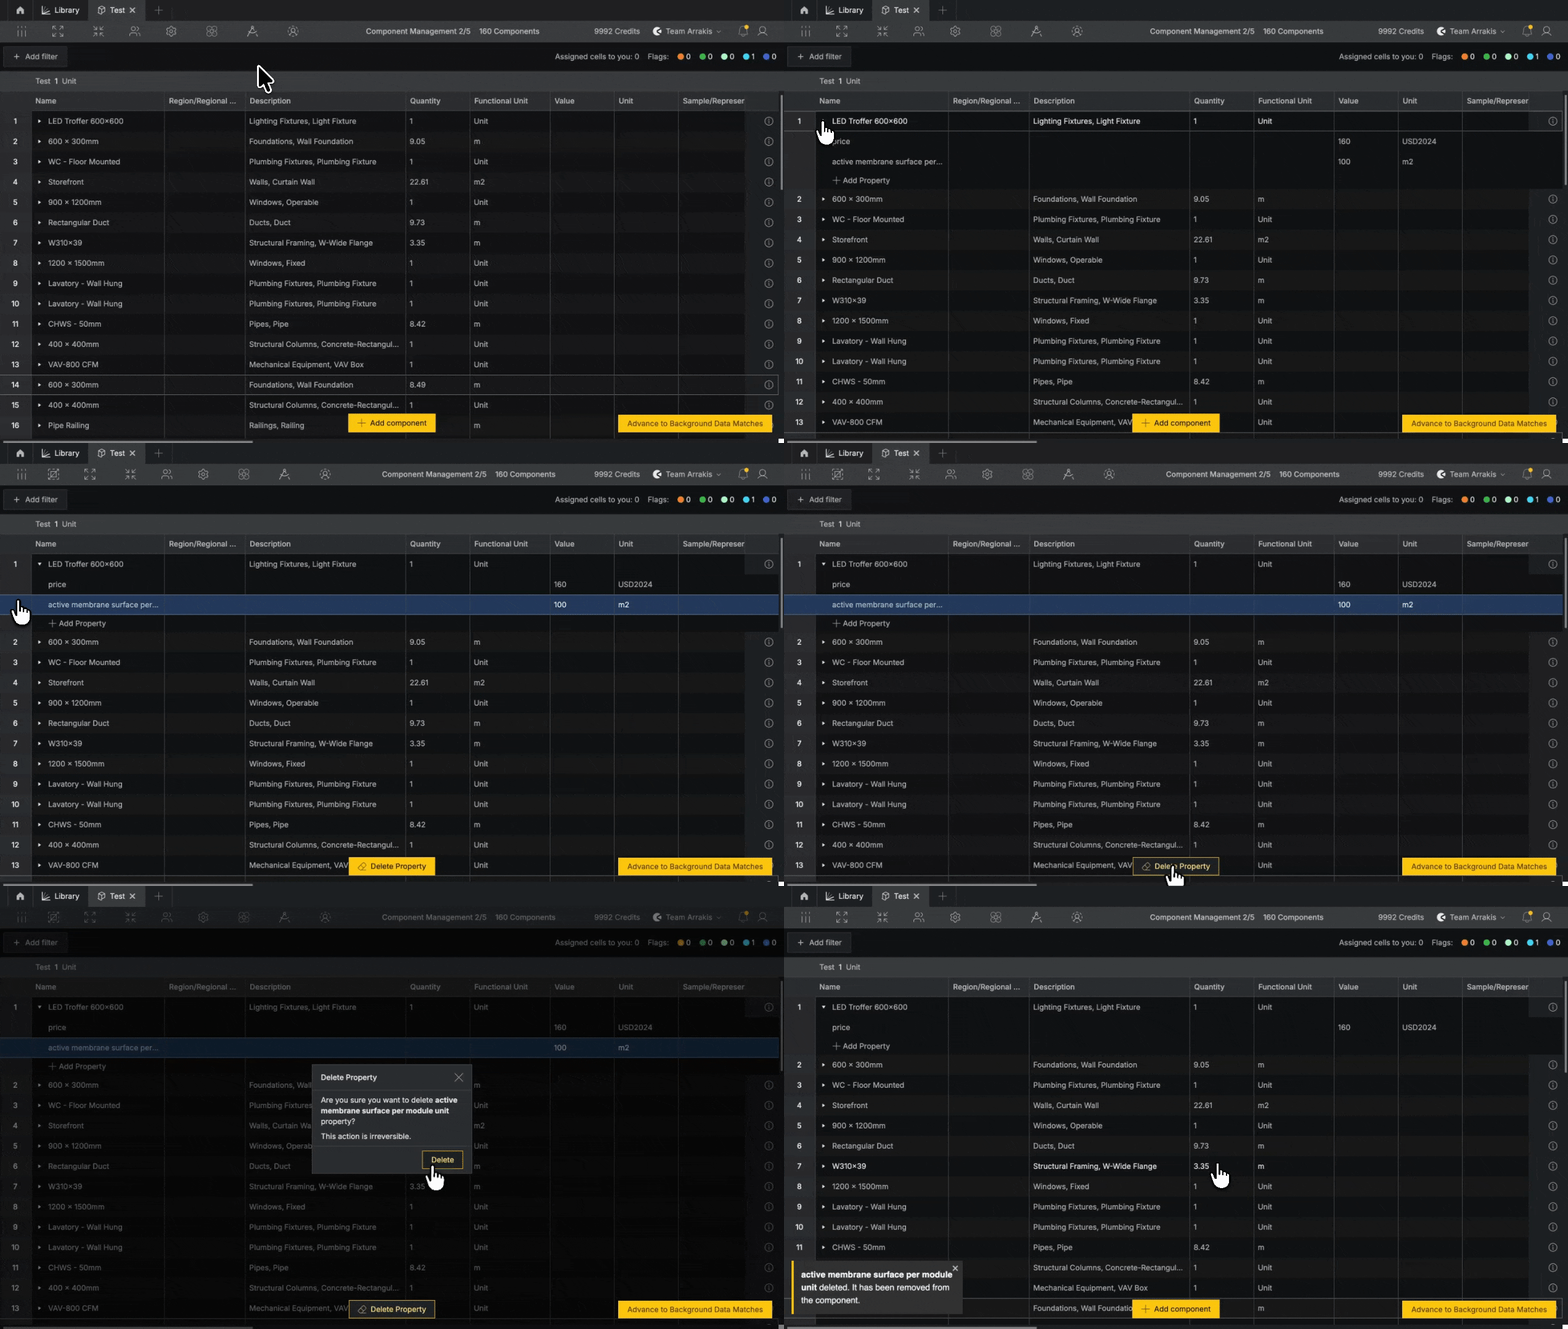
Delete a property#
To delete a property, click on the property’s row, then click Delete Property .
Quality Control#
Alia screens your table automatically using flags. A flag marks a component for your attention based on the rules you define, so errors like typos, outliers, and duplicated components get caught before they reach your results.
There are four flag types within Component Management. Configure them in the Configuration panel:
| Flag | What it does | Example |
|---|---|---|
| Terms | Flags any component containing a specified keyword. | Enter LED and every component containing LED is flagged for review. |
| Value Range | Flags a component where a property value falls outside a defined range. | Enter LED with a minimum of 100 and a maximum of 500, and any LED component with a value outside of that range is flagged. |
| Relative Scale | Flags any component where one property breaks a rule relative to another. | Enter mass < volume and any component where mass is below volume is flagged. |
| Component Conflict | Flags duplicate components to avoid double counting. | Toggle on, and near-identical rows for the same LED component are flagged as a potential double entry. |
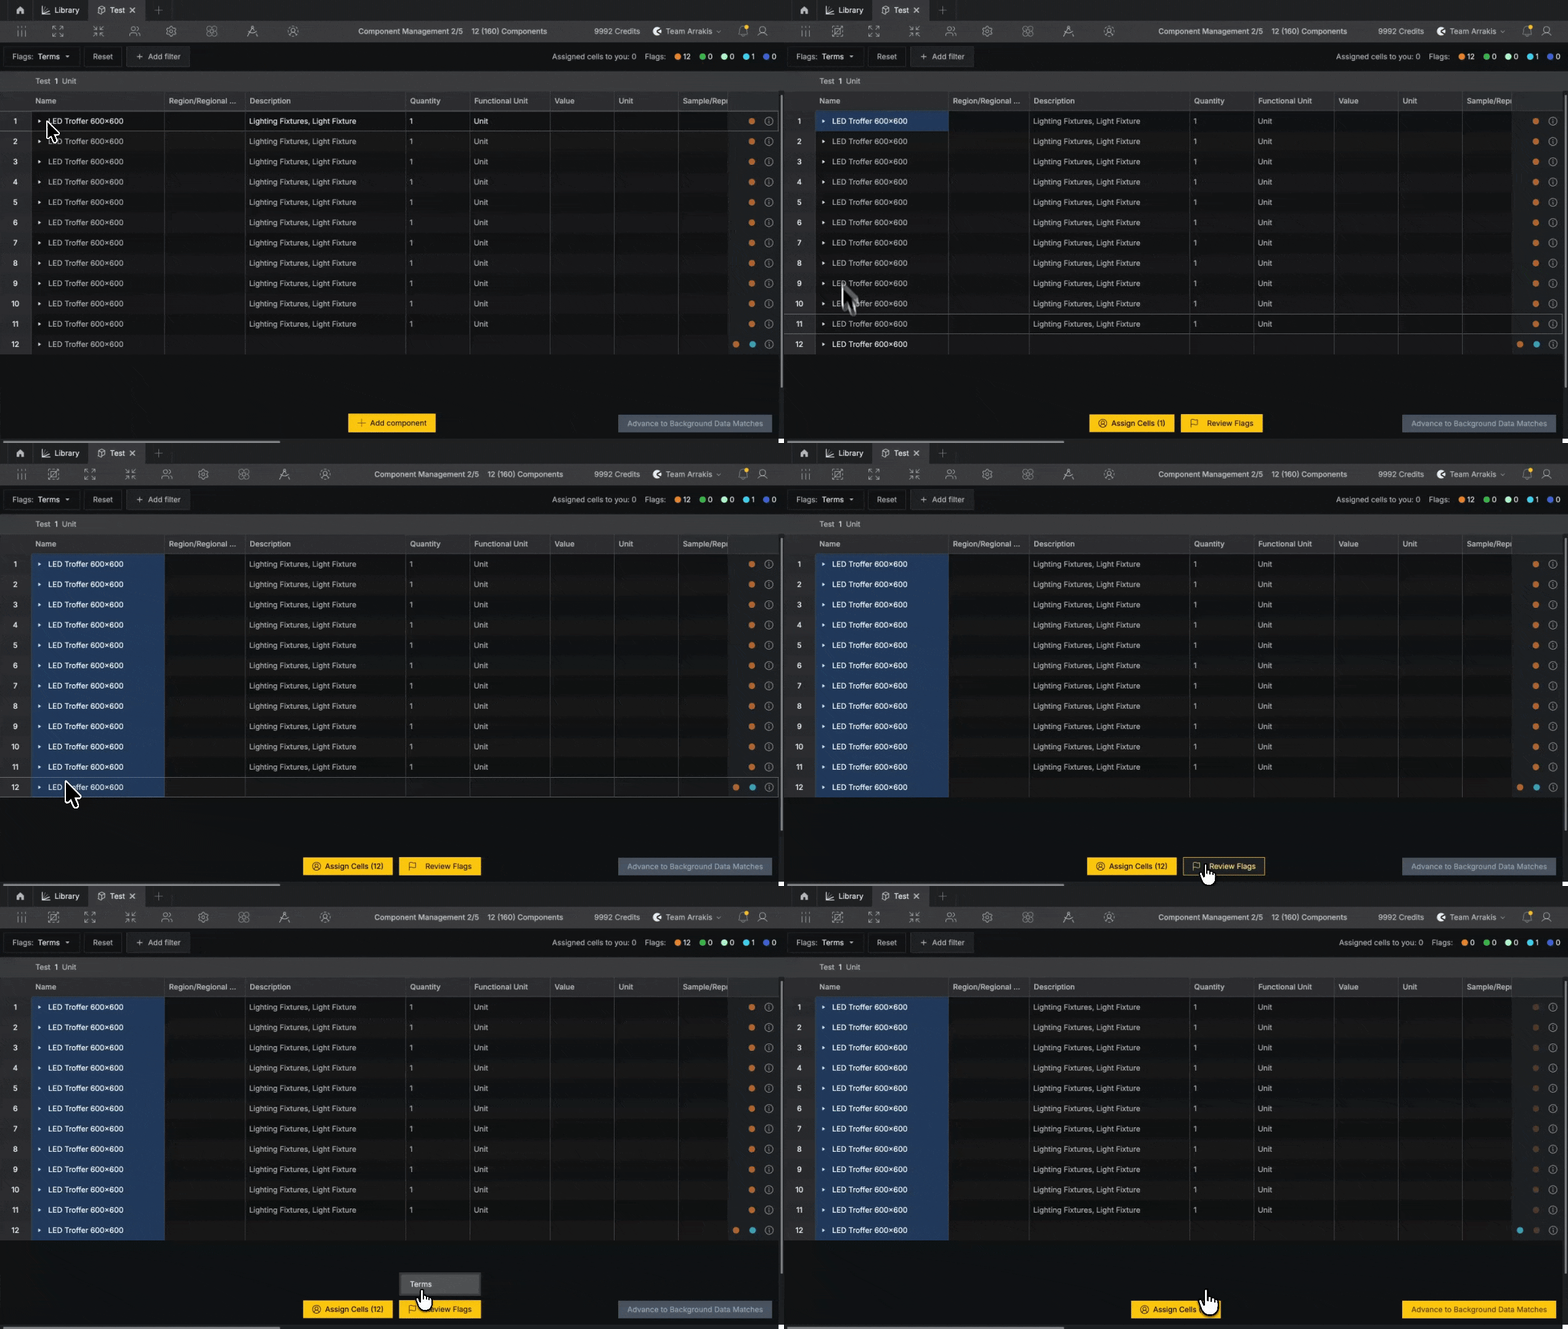
Review Flags#
Click a flagged component and click Review Flags at the bottom of your screen.
You cannot advance to the next stage until all flags have been reviewed.
Enrichment#
During component management, you can enrich properties for each component. Enrichment fills data gaps using AI instead of your uploaded file, the research a practitioner would otherwise do by hand. Eligible components are enriched automatically by AI.
To run enrichment, click on Enrichment on the top bar.
Collaborate#
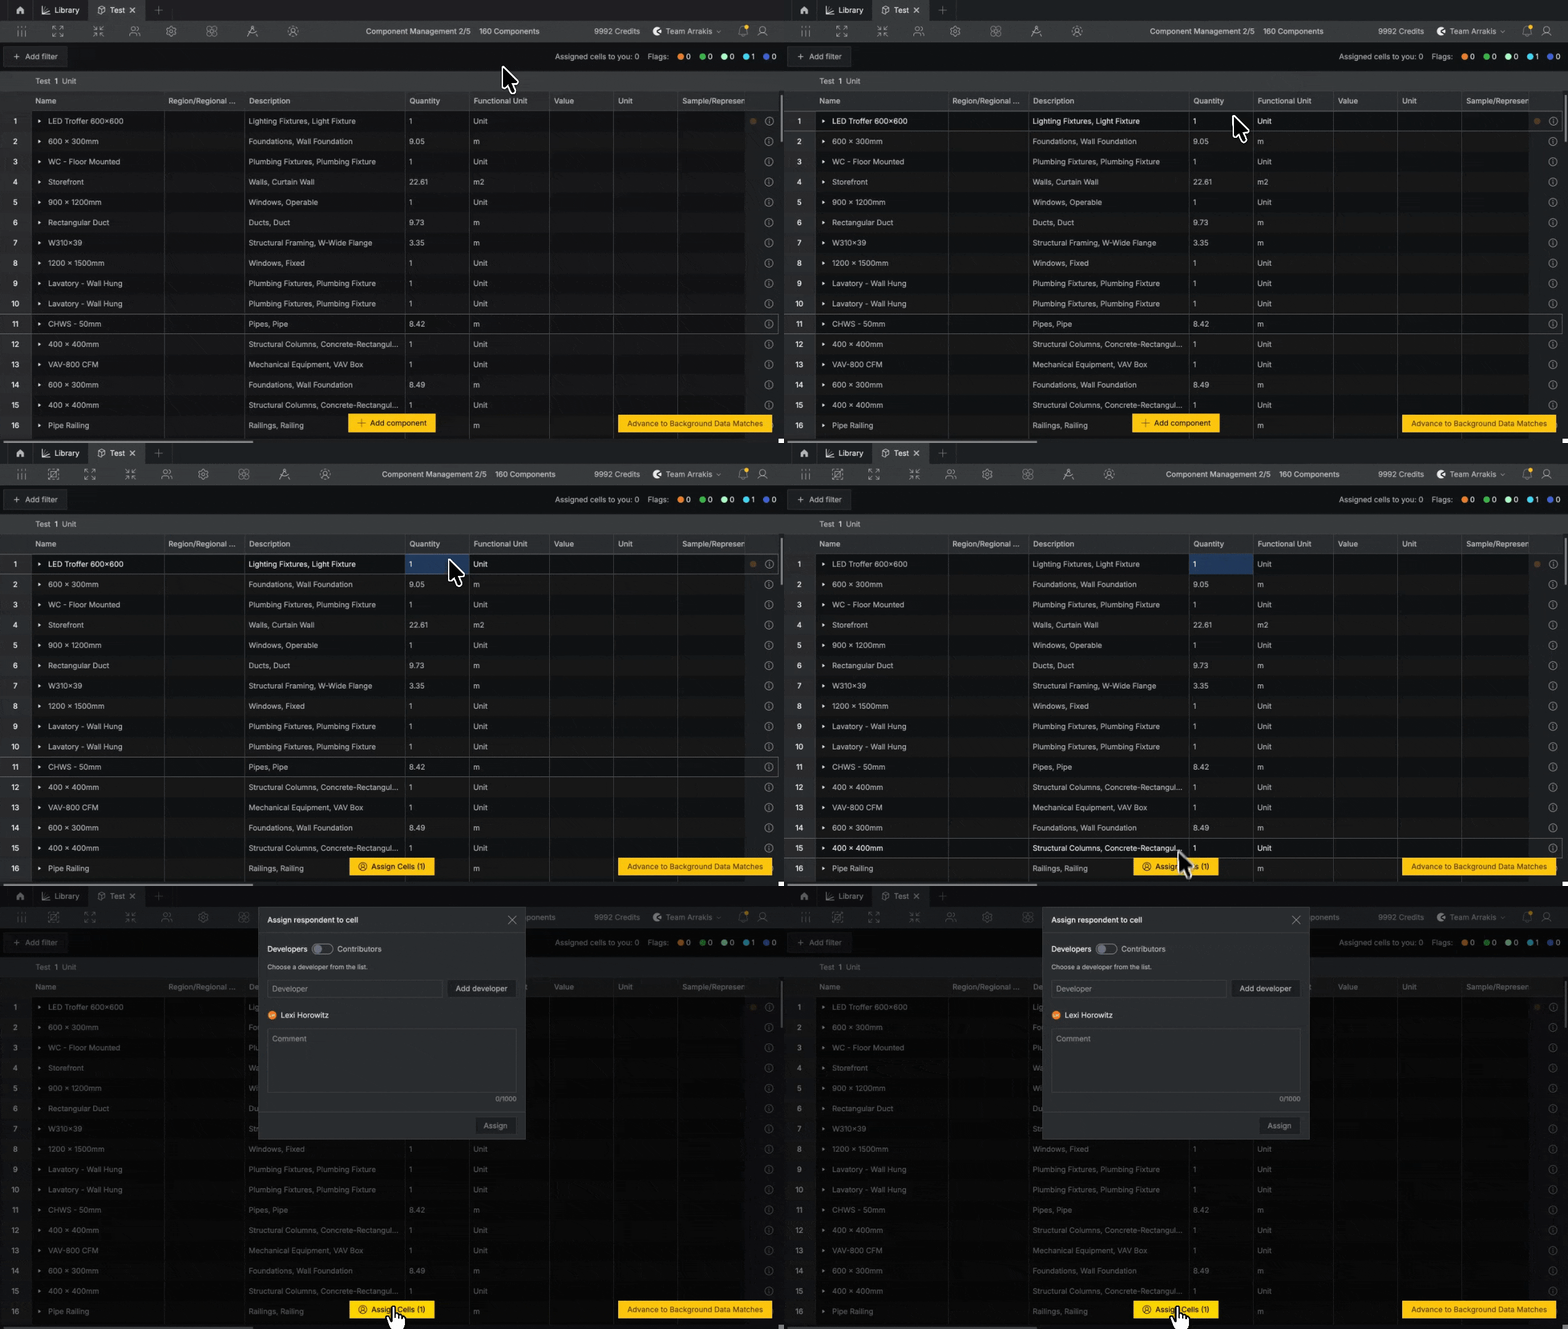
Assign Cells#
Click any cell in your table, then click Assign Cell at the bottom of your screen. You can assign the cell to any Developer and leave a comment for them to review. Assigned cells are locked to everyone else until the assignment is completed or canceled.
In Background Data Matching and Scaling you can assign whole rows rather than individual cells.
Assigning to a Developer#
Any Developer can assign to another Developer. They will get an in-app notification or email with a link back to Alia to complete the assignment. If the user you need isn’t on the project yet, click Add Developer inside the Product Permissions .
Assigning to a Contributor#
Contributors are people outside of your team who can be assigned a specific cell to. They’ll receive an email with a link to a form and fill in only the cells they were assigned.
Background Data Matching#
In this stage, you determine which background datasets Alia can use as matches by applying filters to Circa’s Library. Alia then matches each of your components to the most appropriate dataset.
Three new columns appear in your table:
Background Process: the dataset Alia matched to the component.
Reference Product: the output of that process your component is matched to.
Confidence Score: how confident Alia is in the match.
Background data#
To set background matches, clickConfigure, use the filter dropdowns to narrow the Library, then clickSave Selection.
For example, filter Region to Europe to match only against European datasets, or filter by Source to a specific publisher.
Data quality criteria#
Click the configuration panel, and rank matching priorities by dragging column names up and down. Alia weighs the top ranked attributes most heavily when selecting a match.
For example, rank Region first if geographic representativeness matters most to your study.
Inspectability#
Alia assigns a confidence score to each background data match based on semantic similarity between your component and the dataset. The score appears as a percentage next to each match.
Inspectability is your review threshold: any match that scores below the percentage you define is flagged for review.
Find components without matches#
Toggle on the Empty Matches in the configuration panel to flag any component that did not receive a match. Flagged components must be reviewed before you can advance.
Change a match#
Click the row you would like to change. You have two ways to pick a new match:
From Circa's Library: Clicking Add New Match opens the Library with your Background Data filters already applied. Click Add Match, or double-click the row to apply the new match.
Copy and paste: Select a row with a match you want to reuse, click Copy Match, then select the row(s) and click Paste Match.
Scaling#
During the scaling stage, background data is automatically scaled to the quantity of each component.
Different components scale on different criteria. The property Alia uses is the Scaling Reference: either the component’s Functional unit or a property shared between your component and the background dataset.
Change a scaling reference#
Click the row you would like to adjust, then click Change Scaling Reference and select a different property.
Add a property#
If the right scaling property doesn’t exist, select the component, then click Add Property to create a new one.
Edit component properties#
To edit component properties, click the cell you would like to edit then click Edit Component Properties
Components without a scaling reference#
By default, every component needs a scaling reference before advancing. Any component missing a scaling reference will be flagged.
Generate your report#
Once all stages are complete, Alia calculates your product’s impacts from the matched, scaled background data. From here you can view the results in your browser, export them, or keep modeling in Gesserit.
Pull and View Impacts#
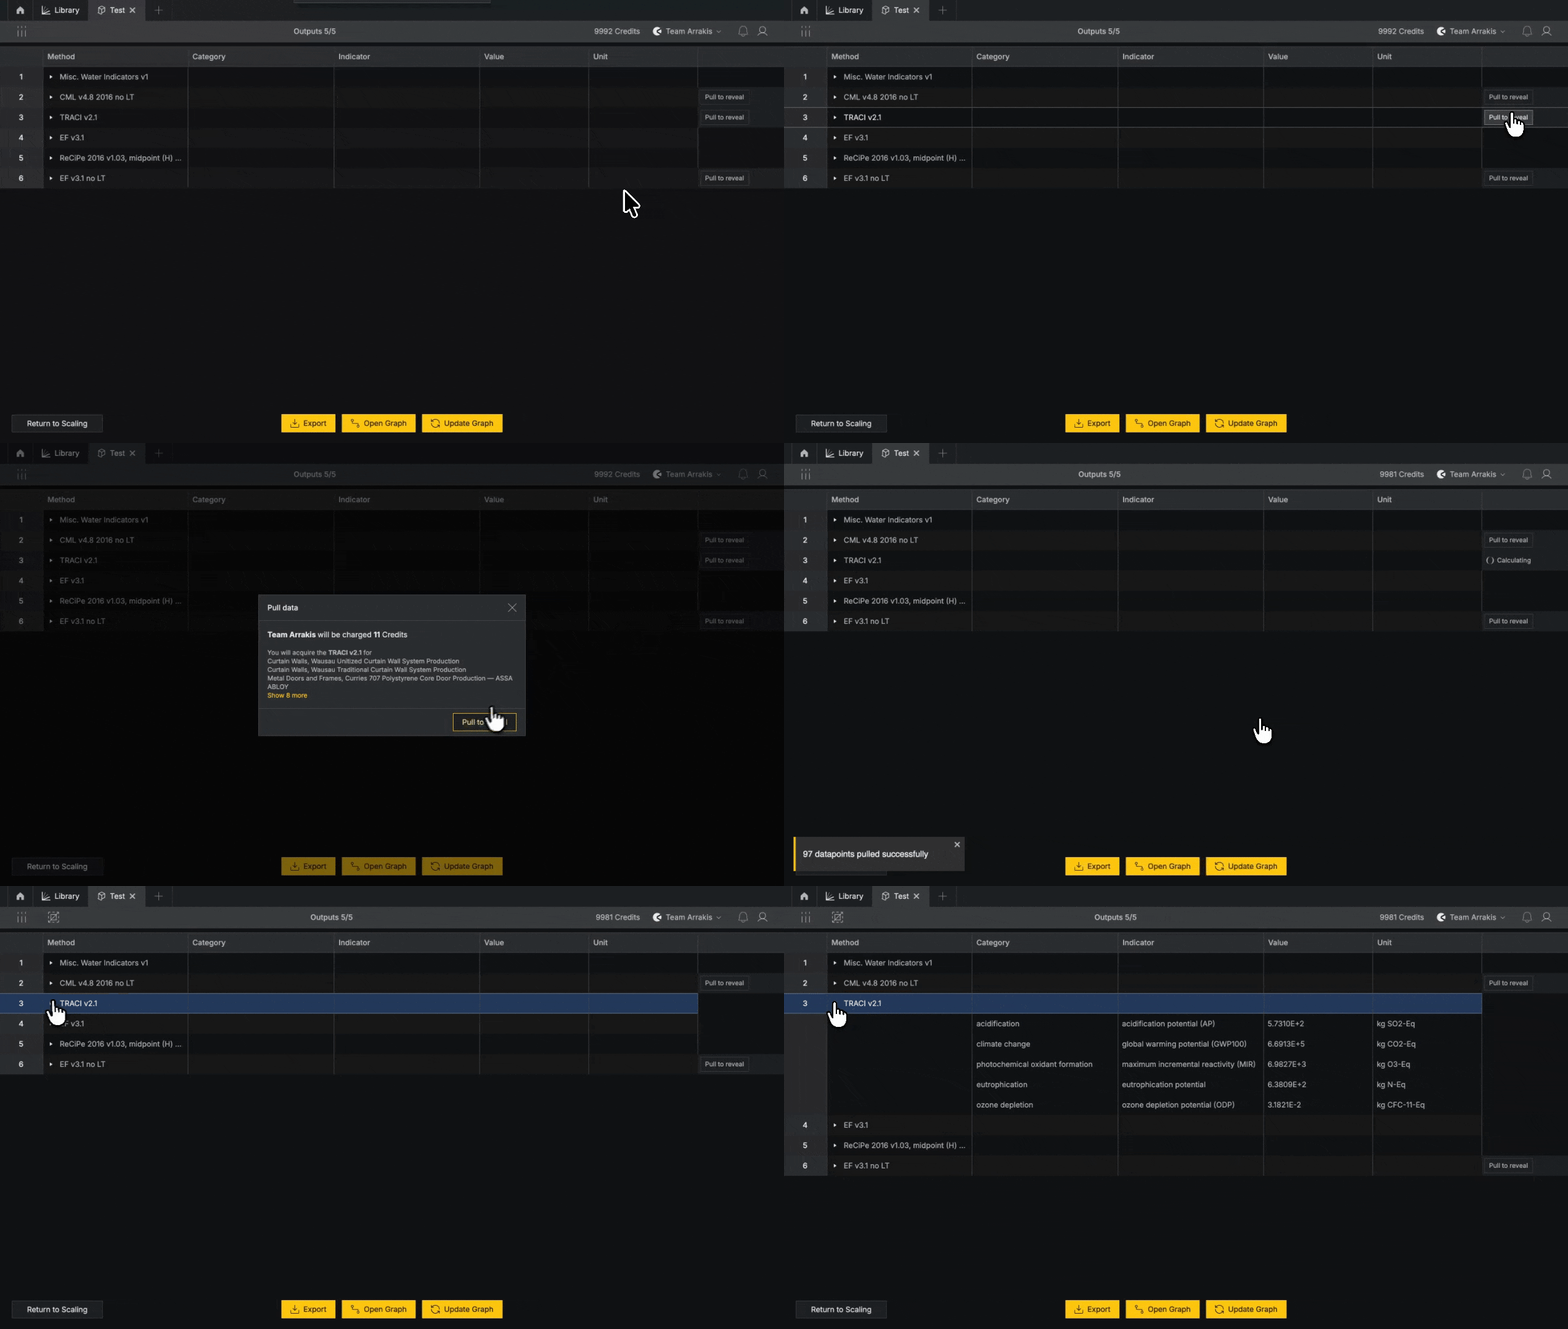
Click Pull to reveal from the characterization method you would like to license. Results are displayed per indicator under each characterization method.
Export Results#
To export your results, click Export . Your results will automatically download as an .xlsx file.
Exports are individual, not collaborative. Exports will only be visible to you, and are not available to Explorers on the project.
Open your model in Gesserit#
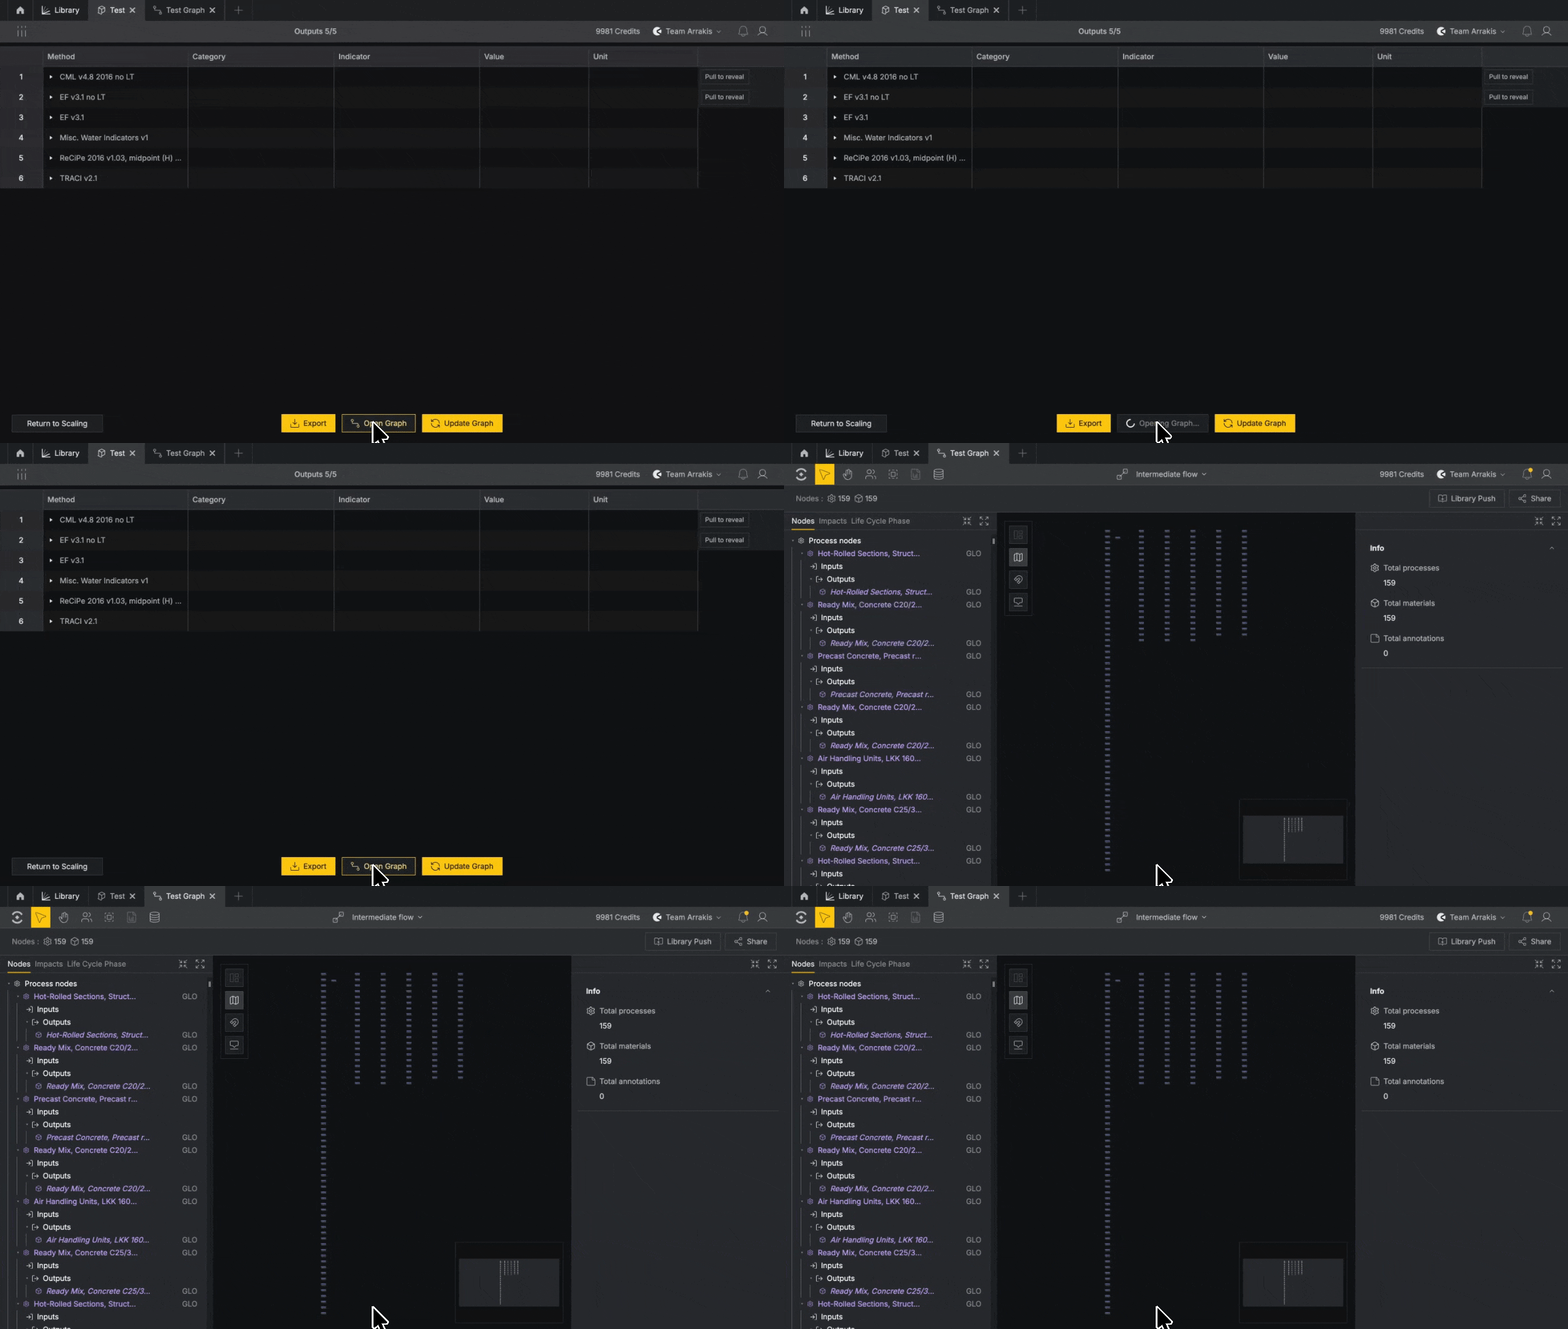
Click Open Graph to view your product as a graph. Alia builds the graph automatically: your product as a custom process, with every background data match connected and scaled. From there you can extend the model as you’d like.
For more information on generating a report in Gesserit, see Begin Modeling
FAQS#
Can I make edits after advancing to another stage?
Yes, you can make edits after advancing to another stage. See Moving between stages for more information.
Is my work automatically saved
Yes, Alia saves as you go, you can exit your browser and come back to the same spot, even while your file is still importing.
How many components can Alia handle?
Alia is built for products with thousands of components.
A component didn’t get a match, what do i do?
Some Background Data filters may be too narrow, resulting in no matches. Use add new match to pick a new dataset yourself, or copy match from a similar component.
Why can’t I edit certain cells?
An uneditable cell may be assigned to someone else, or it’s a field Alia doesn’t allow edits on. Assigned cells will unlock once the assignment is complete or cancelled.
